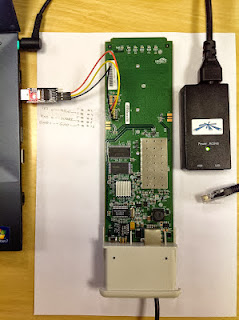
Updating the firmware on Nanostation 5 using serial port and
ethernet port
The video has arabic commentry, but it should be good enough to for english speakers, as the commands and sequence is clear I think.
The video has arabic commentry, but it should be good enough to for english speakers, as the commands and sequence is clear I think.
Nanostation
5 from Ubiquiti
Using a
small flat screwdriver, flip up the plastic label on the back, a bit on the
right and a bit on the left, just enough to expose the the screws.
ِWith a medium sized
Philips screwdriver, undo the screws, as they are a bit tight, it might be
difficult with a small screwdriver.
.
Now get
the left screw.
Now
let's pull out the internals of the nanostation, using the small flat
screwdriver, slowly and gently.
Turn
over and pull out the PCB (Printed Circuit Board) out of the plastic enclosure
completely.
This side has the antenna of the nanostation.
Turn
over gently to get to the other side where the connectors we are concerned with
are.
Put it gently on the table, be careful as the nano is resting on the antenna now, and we don't want to damage that.
The
Serial Port on the Nanostation5
Name,
description, specifications of this Connector (2mm pitch 10pin header
connector):
·
pin header
·
2mm pitch
·
10 pin or 10 contacts or
2x5way
·
Male
·
dual row
·
surface mount
connector
·
Straight
Left
Column Right Column
1 3.3v
2
3 HSIN
4
5
6
7 HSOUT
8
9 GND
10
Unfortunately,
as we see in the pictures above, the pins are not marked, and I couldn't find a
diagram or tutorial about Nanostation-5, but the pins are the same as for
Nanostation-2 shown in this picture.
And I'm going to use what I could get my hands on till now as shown here.
Female
to female jumper cables of 2.54mm pitch.
1)
First USB adaptor (Prolific Technology, Inc. PL2303 Serial Port)
This is
the easy one, as it was clearly marked, we will be using this one to complete
the tutorial and to do the video tutorial.
Make the connection between the USB adapter and the Nanostation 5, like is shown here.
The Black and Yellow cables are next to each other, and because they are of a bigger size than the Nanostation 5 pins, they are a bit tight, so just hold them together and insert them in, they will fit ok, just be careful and don't bend or break the pins.
NS5
Serial Port
USB-TTL
GND<-------------------BLACK
cable--------------->GND
HSOUT<----------------YELLOW
cable--------------->RXD
HSIN<-------------------RED
cable--------------->TXD
Now plug the USB into the computer, but don't turn on the Nanostation yet.
Now on the computer, from a shell or command prompt in Linux.
Check
the name of the Virtual Serial Port that we are going to use to connect to the
Nanostation.
[root@SL6
~]# dmesg | grep ttyUSB | tail -n 1
usb
2-1.3: pl2303 converter now attached to ttyUSB0
Install and configure (minicom) (a serial communication program):
[root@SL6 ~]# yum install minicom
[root@SL6 ~]# vim /etc/minirc.dfl
[root@SL6 ~]# cat /etc/minirc.dfl
pu port /dev/ttyUSB0
pu baudrate 9600
pu bits 8
pu parity N
pu stopbits 1
pu rtscts No
Run the
minicom program
[root@SL6
~]# minicom
Now
plug the turn on the Nanostation and keep your eye on the minicom program that
should be running on your computer.
On the computer's screen, in the minicom program after a couple of secoonds, we will start seeing text scrolling up (the system boot messages) then it will stop and ask for login name and password for the nanostation (default is ubnt/ubnt).
Slows down here while decompressing the Linux kernel (Ubiquiti Nanostation uses Open Source Linux :) )
Screen stopped and asking for login.
To get into the BIOS which is called Redboot on Nanostation, we hit CTRL+C while the Nanostation is booting (not now after everything stopped and we logged in)
We can still do it now, by logging in as above, then running command (reboot) then when it starts booting again we hit ctrl+c (may need or can hit it repeatedly) and the booting process stops and we get into the BIOS (Redboot).
Hitting CTRL+C
We'll
talk in other posts on how/why/what to use the serial connection for like
fixing and completely messed up Nanostation (debrick or debricking) and
flashing firmware etc.
References:
How to recover a
Bricked Ubiquiti NanoStation2 or PicoStation2
index.php/articles/general-
tutorials/how-to-recover-a-
bricked-ubiquiti-nanostation2-
or-picostation2/
NanoStation2 RS232 Connection (this should say
TTL and not RS232)
NanoStation2_RS232_Connection
TTL to
RS232 adaptor Explained
php/2007/06/11/ttl-to-rs232-
adaptor-explained/
FTDIchip.com USB
TTL Serial Cableshttp://www.ftdichip.com/Products/Cables/USBTTLSerial.htm
MICROCONTROLLER
UART TUTORIALhttp://www.societyofrobots.com/microcontroller_uart.shtml
Serial
Interfaces (RS-232 vs TTL) (Recommended Standard 232 vs Transistor-Transistor
Logic)http://www.sparkfun.com/tutorials/215
Pins on
serial interface of NS5 is same as NS2
showthread.php?t=21454
Ubiquiti
UART (LS5/LS2 JP1) (pin1,2 -- 3.3V (Vcc) , pin3 -- SIN (RX) , pin5 --
CTS , pin7 -- RTS , pin9 -- SOUT (TX) , pin11,12 -- GND )
showthread.php?t=182


No comments:
Post a Comment